

Manage Scheduled Event
Classroom events, live webinars, and hands-on training & evaluations can be presented and recorded in Ability LMS. Trainers and co-instructors can set-up events, send emails to participants, and mark attendance in the system.
-
Benefits of Adding Upcoming Training Events to the Ability Calendar
- Instructors can offer open enrollment to MSU community or restrict by department or invite only.
- Instructors can share event link in an email or webpage.
- Enrollees receive email confirmation and reminders 1-3 days before the event.
- Instructors set the seating minimum/maximums.
- Waitlist feature automatically moves people from waitlist into empty seats when there are cancellations.
- Prepare the right amount of materials based on number of enrollments the day before the event and print out sign-in sheet.
- Quickly notify participants of changes such as cancellations or rescheduling by sending Ability roster emails.
- Discourage walk-ins to on-site events and and uninvited Zoom visitors. Or accept them and easily add to roster.
- Record attendance in Ability and make certificates immediately available. No shows also shown in history.
- Additional workflows and tools are available to assess learning and automate recording attendance.
Schedule an On-site or Zoom Event
Note that courses must be pre-approved and set-up in Ability, including new courses in some cases to reflect a different delivery mode. Any new locations or trainers not currently found in the system can be added to the system.
-
Schedule On-Site Event
Make sure you are prepared with the course title/ID, location, trainer, date, start time, end time, maximum and minimum class size. To add new courses, trainers, or locations, or to change default properties, such as maximum class size, contact the help desk.
- Select Manager Menu > Master Schedule.
- Click the green plus sign + icon.
- Enter in the course ID or title to find the correct course.
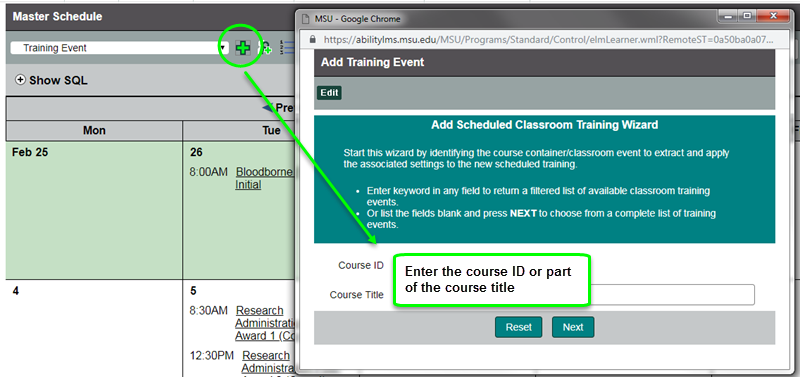
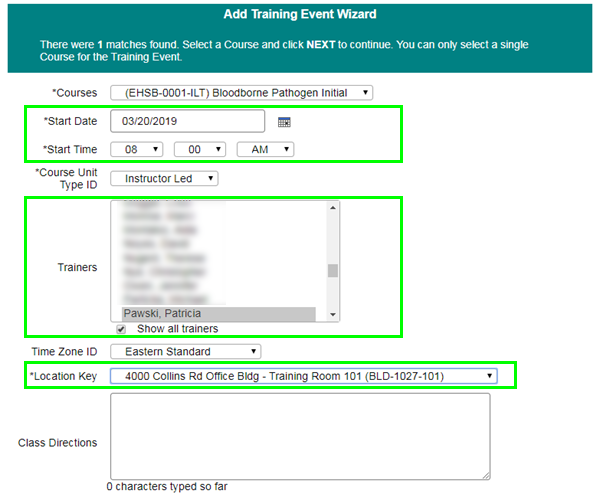
- Enter the date, start time, location, and trainer. Continue clicking Next to finish creating your event. Confirm the course details on the Properties tab.
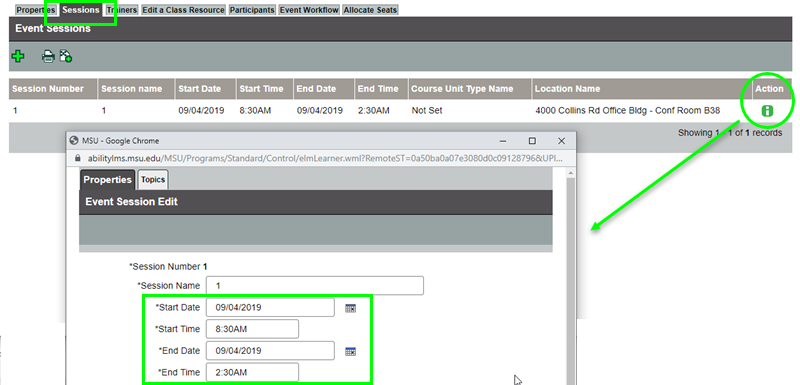
The class end time is calculated based on the default duration of the course. If, after creating the class, you need to edit the start or end time, select the Sessions tab. Click on the green i icon and edit the start or end time.
If you need a registration link to distribute to a known group of employees/students, look for the enroll link between the main navigation and tabs.

-
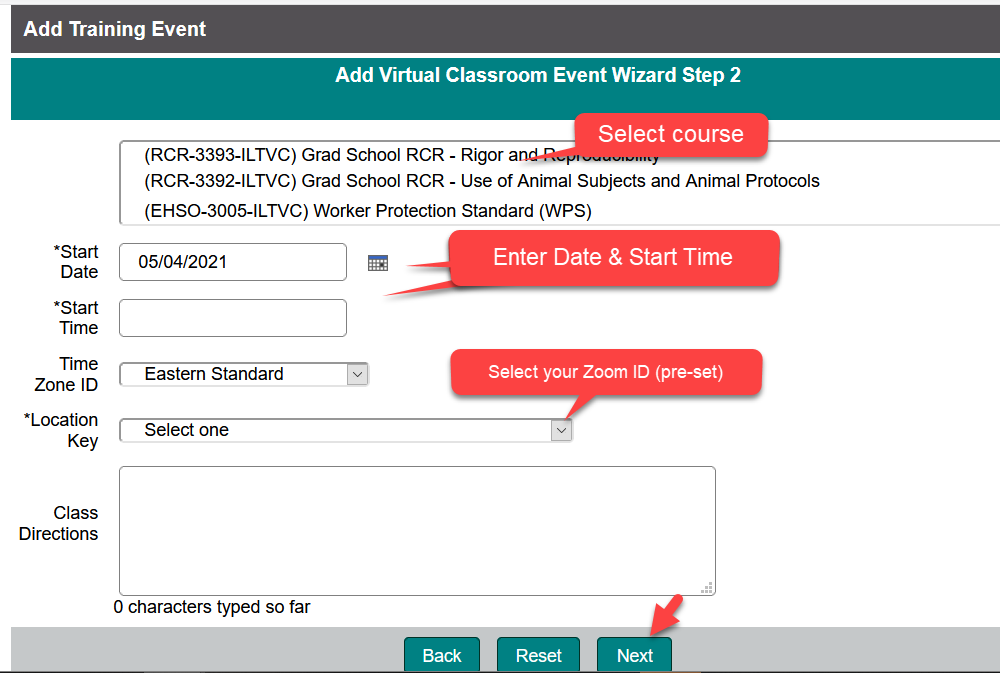
Schedule Virtual (Zoom) Event
Creating Virtual Course events and other Instructor-Led Training Events is very similar. Use the appropriate drop-down on the Master Calendar.
If you need to change an on-site event to a virtual class (or visa versa), you must create a new class from the right course type. Request assistance from the Ability support desk. Do not cancel the original event until the current enrollee list has been saved.
Learners using the Zoom MSU HIPAA account have different login instructions
If your audience may include users with Zoom HIPAA accounts (typically those in health care settings), provide learners with Zoom HIPAA login directions (docx). HIPAA account users may lose Zoom permissions or scheduling rights if they do not connect to a standard Zoom meeting using these steps.
See also:
- MSU Zoom- Login button, Zoom basics, advanced licensing info, service alerts
- MSU Zoom Help Center - quick video tutorials and FAQ
Recurring virtual events
If you have recurring virtual events, using Zoom’s webinar feature may provide some additional features that will help you with attendance and control of your audience. The Zoom webinar feature is free for MSU faculty, staff and students for attendance of up to 500 people.
If you are interested in learning more about Zoom webinars, the MSU IT Service Desk has a good overview: https://tdx.msu.edu/TDClient/32/Portal/KB/ArticleDet?ID=1055.
-
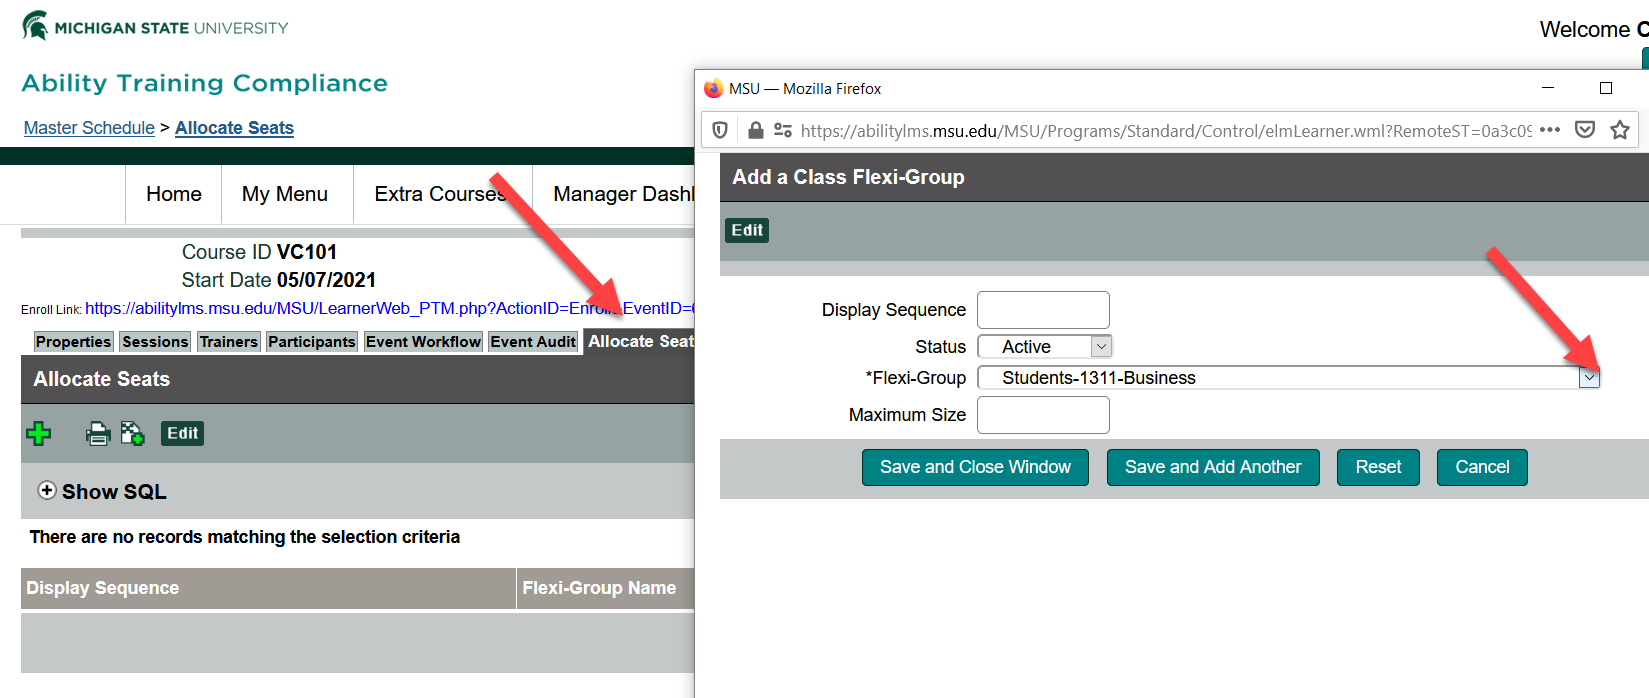
Reserve Seats for a Specific Unit
Reserve or restrict seats using the Allocate Seats tab.
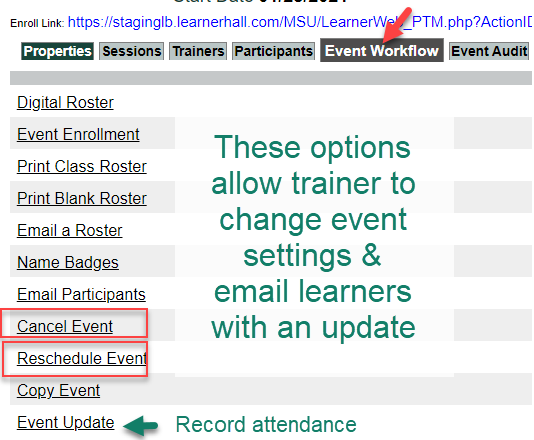
Change Event Properties or Contact Participants
Common tasks are under the Event Workflow tab.
For both virtual classes and on-site events on the calendar, click
Manager Menu > Master Schedule and then click the class/event.
Click the Event Workflow tab and search for the right option.
-
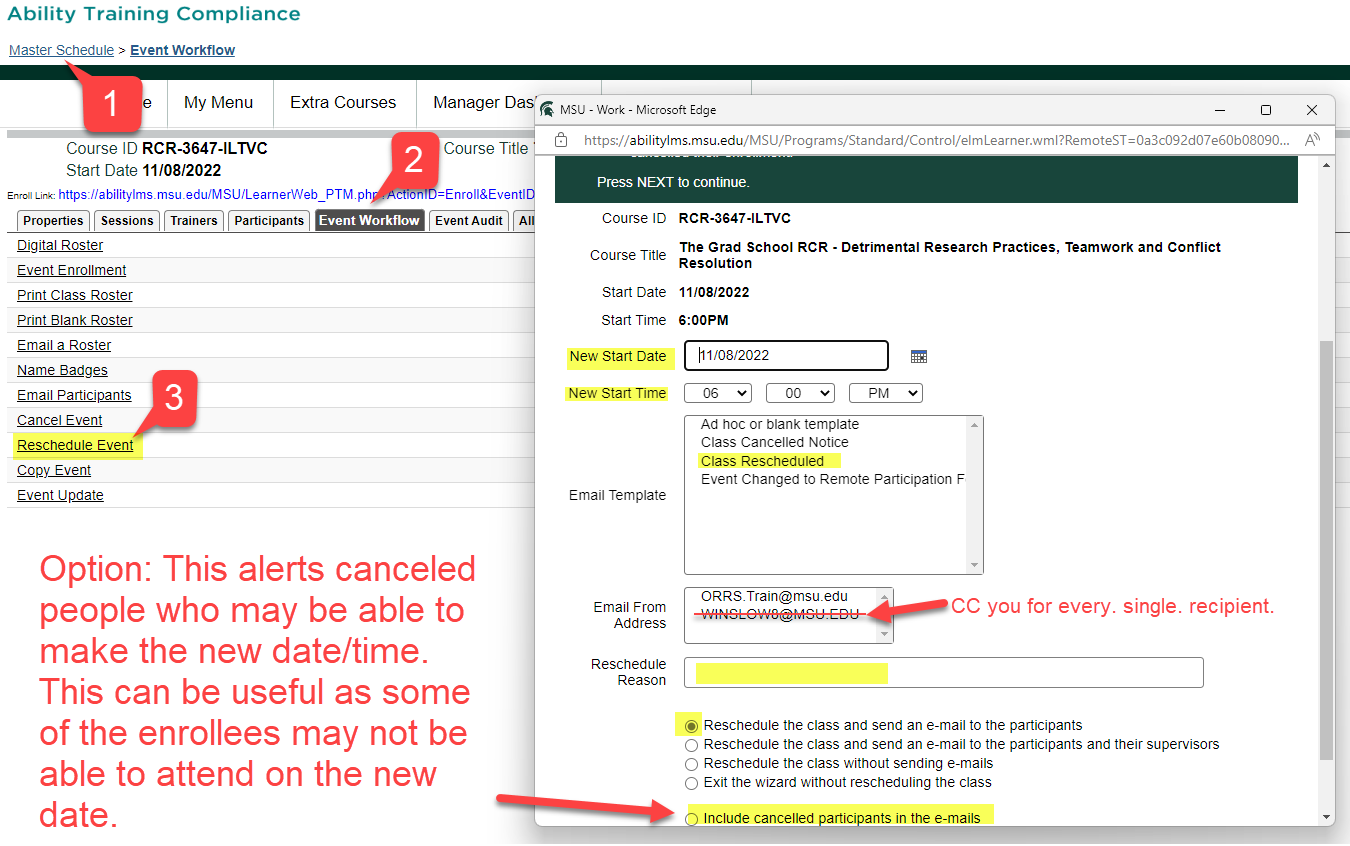
Reschedule, Relocate, or Cancel Class Event
To change the Zoom login for a calendared event, click Properties tab. Type in corrected information at least 20 minutes prior to the start of the event to ensure participants' Join Session link works.
To change an event from an on-site event to a virtual class or zoom webinar, you will need to create an entirely new calendar event with that course type. Contact the Ability support desk for assistance with moving your enrollees to the new event before closing the initial event.
The Reschedule Event link offers emailing enrollees about a change in date and time (screen image). It cannot change locations or from webinar to in-person event types.
-
View/Print Roster
To print a sign-in roster from registrant list: Event Workflow > Print Class Roster.
-
Send an Email to Learners
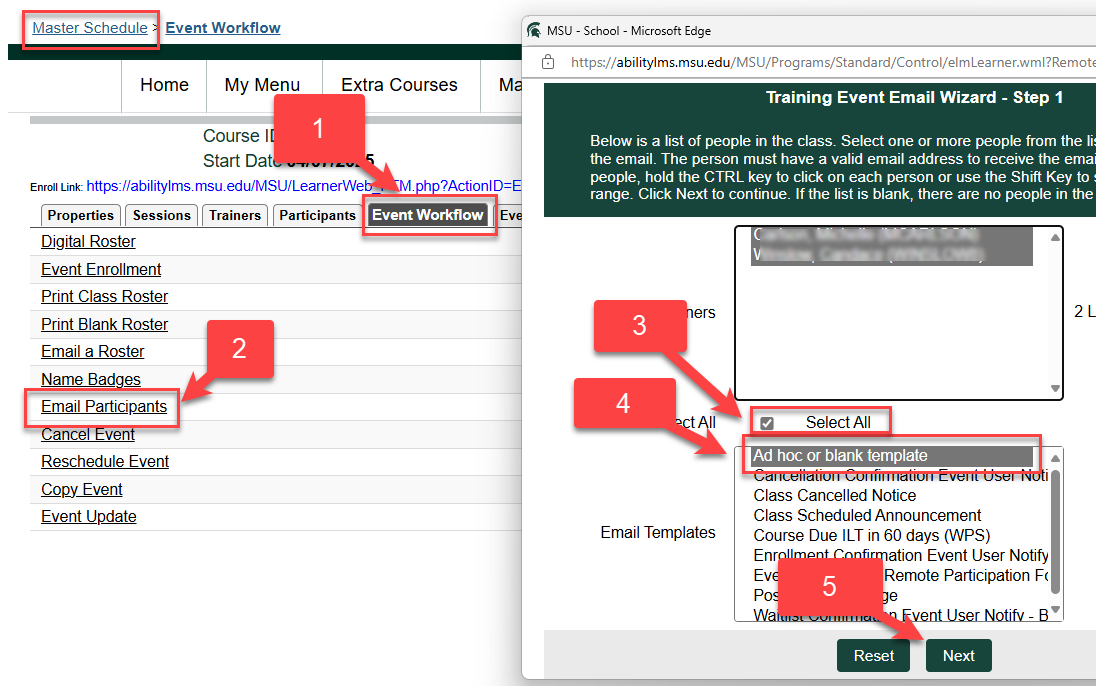
You can send learners enrolled in your event an email giving them additional information or to notify them of changes. Use the ad hoc template and select the recipients either individuals or all. (steps image)
Event Workflow > Email Participants
If you click Email Participants, a pop-up will give you several options. Most have pre-entered variables that will automatically bring in information from the exact event. Most will allow you to edit the email. Some allow you to select one or more specific students or the entire list.
For security reasons, you must specify the system address ORRS.train@msu.edu as the sender. You can add your personal contact information at the bottom of the email.
-
Trainer/Instructor Name
You can give credit to the trainer on all the completion records.
Record Attendance and Close Event
For both virtual classes and on-site events on the calendar, click
Manager Menu > Master Schedule and then click the class/event.
-
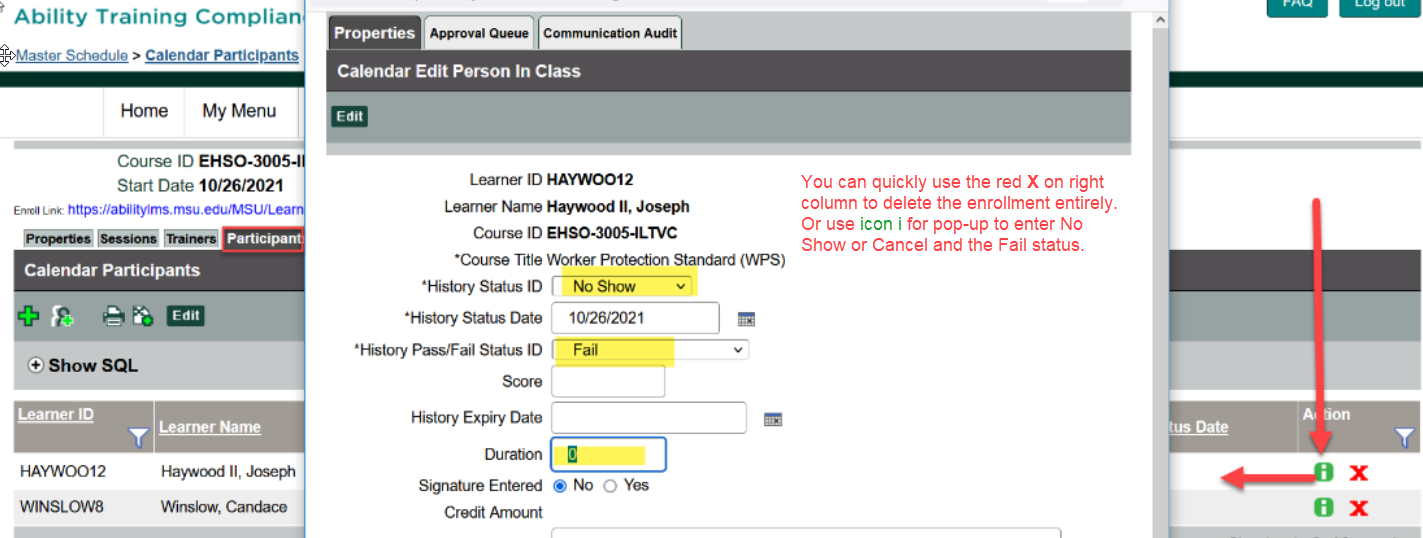
Step 1: Participant tab
It is optional, but helpful to start by recording your Walk-ins and No-Shows first. This simplifies recording completions because No Shows and Cancellations are removed from the attendance roster.
- Use green +icon to add any walk-ins.
Virtual Classes (VC) using Join Session button should never have 'walk/drop-ins' unless the Zoom login is shared outside of Ability. - Use the green i in right-column to mark any No-Shows.
For Virtual Classes (VC), learner status will automatically change from Enrolled to In-Progress as soon as the learner clicks the Join Session button. Anyone remaining as Enrolled is likely a No-Show unless they were given the login outside of Ability.
You may update the participant roster further with a Zoom attendance report before bulk updating the Finished/Pass records or from the Event Update next.
- Use green +icon to add any walk-ins.
-
Step 2: Event Workflow tab
Click the Event Update link at the bottom of the list of options on the Event Workflow tab. Enter both the History Status and the Completion Status from either the default (for all remaining) or individually (particularly if you did not use the Participant tab to update the roster).
- For on-site training event, you can mark the History Status ID as Finished and the Completion status as Pass for full-credit.
- For most virtual classes (Zoom webinar), trainers mark the History Status ID as Finished and the Completion status as Pass for full-credit.
- For a WPS Zoom class, an additional workflow allows learners to upload their signed document to the class space after you have marked their History Status ID as Finished. Only record Completion Status as In-Progress.
If you record StatusID as Finished along with Completion Status of Pass or NA at this point, the learner will be able to print a certificate of completion immediately (image).
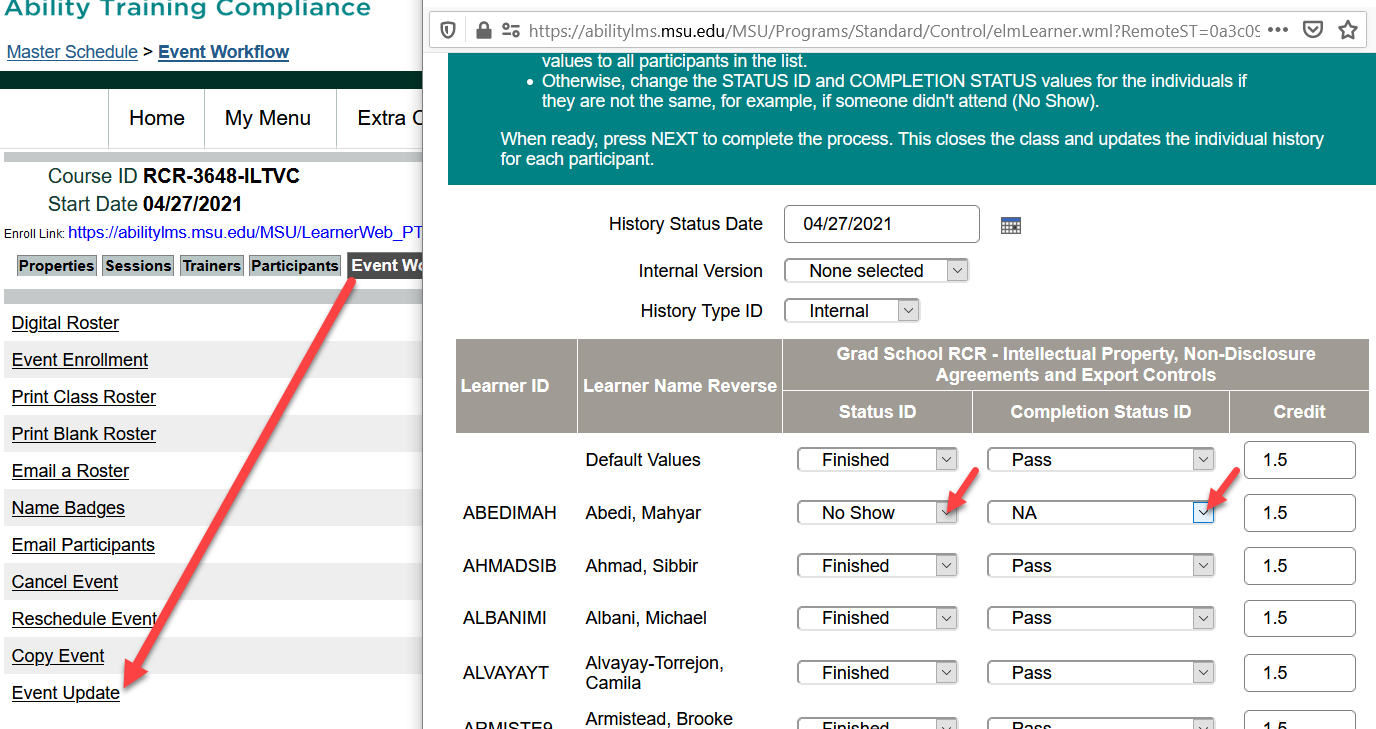
Clicking NEXT button will automatically close the event to further editing! Once Next button is clicked, the event automatically closes to further editing. Each learner's course history will be updated and corrections will have to be made individually rather than by class. Contact the Ability support desk if you need assistance with changing attendance/completion records after the event has been closed.
Academic units providing providing RCR training to students: see the RCR-FAQ site.